Wrinkle Powder Coating: How It Works and How to Get It Right
By: Columbia Coatings Staff
Published: May 17, 2026
Related Posts & Articles
By: Columbia Coatings Staff
Published: July 10, 2026
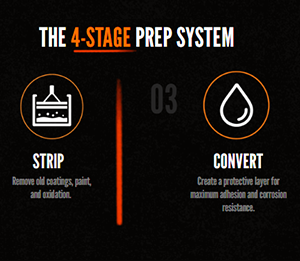
So you are working through the four stages of Prep: Stage one, the part is clean. Stage 2, the old coating is off If it needed outgassing, that is done.…
By: Columbia Coatings Staff
Published: July 2, 2026
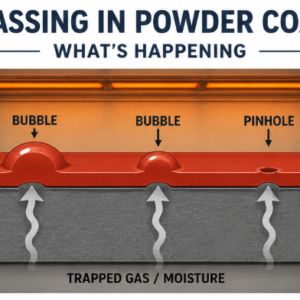
The contamination is not on the surface. It is inside the metal. You cleaned the part. You may have cleaned it twice. The degreaser bath was at concentration, the temperature…
By: Columbia Coatings Staff
Published: July 2, 2026
Stage 2: Strip One Uses Chemistry. One Uses Force. Choosing Wrong Costs You Parts. If you read the Know Your Part article, you know that not every part starts at…
By: Columbia Coatings Staff
Published: June 29, 2026
Every Method for Getting There and the Chemistry That Makes the Difference The four-stage prep system starts here. Before stripping. Before conversion. Before anything else touches the part. Stage 1…
By: Columbia Coatings Staff
Published: June 18, 2026
You know the four stages of prep: Clean, Strip, Convert, Repair and Protect. That is the system. Every durable coating job moves through some combination of those stages, but you…
By: Columbia Coatings Staff
Published: June 10, 2026
Most powder coating failures start before powder is ever sprayed. Fish eyes, peeling, adhesion problems, they trace back to the prep line, not the booth. This article breaks down the…

By: Columbia Coatings Staff
Published: June 2, 2026
Welcome to our Frequently Asked Questions page! This resource is designed to evolve alongside our articles for our Prep Like a Pro series. We’ll be updating this page regularly with…
By: Columbia Coatings Staff
Published: May 17, 2026
This guide is written for coaters who want to understand what’s actually happening when wrinkle powder cures, and how to control it. If you’ve sprayed wrinkle and gotten inconsistent results,…

By: Columbia Coatings Staff
Published: May 7, 2026
ATTENTION: Powder is VERY heat sensitive. Due to the high heat index, Columbia Coatings recommends selecting an expedited shipping method for your powder deliveries in order to preserve the quality of your powder.…

By: Columbia Coatings Staff
Published: April 22, 2026
Level Up Your Shop: The Columbia Coatings Rewards Breakdown! Stop just buying, start earning. At Columbia Coatings, we know you’re putting in the work to get that perfect finish. Whether…
This guide is written for coaters who want to understand what’s actually happening when wrinkle powder cures, and how to control it. If you’ve sprayed wrinkle and gotten inconsistent results, this will help you connect the chemistry to the technique.
Wrinkle textures are not happy accidents that give your parts a rugged look. They are coatings with a controlled chemical reaction taking place to create their unique effect. Once you understand what’s happening during the cure, the application issues become easy to identify and prevent.
What Wrinkle Powder Actually Is
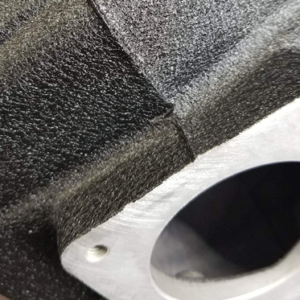
Wrinkle powder is a specialized decorative coating designed to produce a dense, tactile texture. It’s a pattern of fine ridges that resembles a dried riverbed or aged leather. Where most powders are chasing a smooth, glass-like surface, wrinkle powder is engineered to do the opposite on purpose.
The result is a distinctive, highly durable, rugged finish. Wrinkle coatings show up in industrial environments, automotive parts, electronics housings, tool applications, and anywhere functionality and style both matter.
The Chemistry: Why It Wrinkles
The wrinkle effect is a controlled chemical reaction, not a defect. Wrinkle powders contain curing agents that cause the surface layer of the coating to dry and shrink faster than the underlying layer. When the bottom layer eventually cures and expands, it pushes against the already-set surface and forces it to bunch and ridge upward.
Think of it like drying paint on a flexible surface that’s still moving underneath. The top locks in place first. The bottom catches up and has nowhere to go but up.
This is why consistency in application thickness and oven temperature is so critical. Disrupt either variable and you disrupt the reaction timing, which changes the texture or prevents it from forming at all.
Surface Prep: The Non-Negotiable
Before we get into application, a critical note on prep. Wrinkle powder hides surface scratches and mechanical imperfections well. It does not hide contamination.
Oil, grease, moisture or any outgassing from the substrate will cause the wrinkle pattern to pull away from the surface or fail to form properly. The texture that masks a grind mark will telegraph an oily fingerprint. Clean and outgas the part before coating. There are no shortcuts here, and there is no fix after the fact.
When to Use a Wrinkle Finish
| Application | Reason Wrinkle Works Here |
|---|---|
| Automotive valve covers, brackets, and engine components | Hides surface imperfections; handles heat and oil exposure well |
| Toolboxes, handles, and hand tools | Masks fingerprints and smudges; provides grip |
| Camera equipment and electronics housings | Scatters light to eliminate glare and reflection |
| Industrial consoles and control panels | Low-sheen finish reduces eye fatigue in lit environments |
| Fabricated steel with minor surface defects | Texture masks scratches, pits, and grind marks that smooth coatings would expose |
Black Wrinkle, Columbia Coatings May 2026 Color of the Month, is a good example of why this texture deserves its own article. It’s a regular pick for automotive and tool applications because the texture stands up to wear and hides the handling marks those parts naturally collect over time.
Three Variables That Control Your Result
1. Film Thickness
Apply at 3.0 to 5.0 mils. Too thin and the surface layer won’t have enough mass to form the texture. Too thick and the pattern becomes heavy and irregular, often described as ‘blobby’. Consistency across the part matters as much as hitting the right range.
2. Surface Cleanliness
The substrate must be chemically clean and fully outgassed. Wrinkle powder will not adhere properly over contamination. Even though the texture masks mechanical flaws, it will telegraph oil, moisture and outgassing in the form of pattern voids or adhesion failure.
3. Oven Temperature
The oven must be fully preheated before the part enters. Wrinkle powder is sensitive to temperature ramp rate. If the part heats too slowly, the surface and substrate layers may cure at similar rates, which can eliminate the differential that creates the texture. Preheat fully. Don’t rush the ramp. The powder needs time to stage its flow-out, or the wrinkle may not form properly.
Common Problems and What’s Causing Them
Texture Isn’t Forming
Usually a film thickness or temperature problem. Check that your application is hitting the 3.0 to 5.0 mil range and that the oven was fully up to temperature before the part went in. A cold oven is the most common cause of flat results with wrinkle powder.
Another common cause of wrinkle failure is spraying while the substrate is still scorching hot from the oven. Hot flocking, as it’s called, will cause the wrinkle to prematurely flow out, eliminating the folding skin effect that creates the texture.
Pattern Looks Uneven Across the Part
Inconsistent application thickness. Thicker areas will wrinkle more aggressively, and thinner areas may not wrinkle at all. Take your time spraying and check thickness across the entire surface before it goes into the oven.
Texture Is Pulling Away or Lifting
Almost always a contamination issue. Oil or outgassing from the substrate is interfering with adhesion. Strip, clean, outgas, and recoat. There’s no fix for this after the fact.
Quick Reference
| Parameter | Target Range / Requirement |
|---|---|
| Film Thickness | 3.0 to 5.0 mils |
| Oven Condition at Entry | Fully preheated to cure temperature |
| Surface Prep | Chemically clean; fully outgassed |
| Surface Defects | Minor scratches and pits: acceptable. Oil or contamination: not acceptable. |
| Cure Schedule | Per TDS for specific product. Do not substitute generic cure profiles. |
Closing Thought
Wrinkle powder rewards coaters who treat it like a system, not a finish. The chemistry, the thickness, the preheat and the prep are all linked. Change one and the others have to flex to compensate.
If you’re new to a wrinkle product, run a test panel before you commit to a production part. Document the thickness, the cure schedule and the result. Build a reference for your shop so the next coater, or the next version of you a month from now, doesn’t have to relearn it from scratch.
A: It’s not recommended. The texture that makes wrinkle powder distinctive depends on the surface being open and dimensional. A clear coat fills the ridges, flattens the visual depth and changes the finish to something that looks more like a heavy texture than a true wrinkle. If durability is the concern, the wrinkle finish itself is already highly resistant to wear and impact without a topcoat.
A: Both produce a non-smooth finish, but the mechanism is different. Texture powders create their effect through additives in the powder itself, which produce a consistent pattern as soon as the coating melts and flows. Wrinkle powders rely on a controlled chemical reaction during cure, where the surface layer shrinks faster than the underlying layer. That difference is why wrinkle powders are more sensitive to film thickness and oven temperature than standard textures.
A: Wrinkle is generally a one-shot finish. The texture is created by the cure dynamics, not by the application, so applying a second coat over an already-cured wrinkle won’t produce a matching texture. If you need to repair a part, the practical path is to strip and recoat the affected area or the entire part.
A: The most common causes are inconsistent film thickness from part to part and oven loading. If your oven was loaded heavily on one run and lightly on another, the heat-up rate changes, which changes the cure dynamics that produce the texture. Both variables are worth checking before assuming the powder itself is inconsistent.
Got a wrinkle we didn’t iron out?
Contact Columbia Coatings technical support team or reference the product TDS for cure schedule and application parameters specific to your powder.