Outgassing for Powder Coating: When to Pre-Bake, When to Prime, and Why Surface Cleaning Is Not Enough
By: Columbia Coatings Staff
Published: July 2, 2026
Related Posts & Articles
By: Columbia Coatings Staff
Published: July 2, 2026
Outgassing in Powder Coating When Surface Cleaning Is Not Enough You cleaned the part. You may have cleaned it twice. The degreaser bath was at concentration, the temperature was right,…
By: Columbia Coatings Staff
Published: July 2, 2026
Stage 2: Strip One Uses Chemistry. One Uses Force. Choosing Wrong Costs You Parts. If you read the Know Your Part article, you know that not every part starts at…
By: Columbia Coatings Staff
Published: June 29, 2026
Every Method for Getting There and the Chemistry That Makes the Difference The four-stage prep system starts here. Before stripping. Before conversion. Before anything else touches the part. Stage 1…
By: Columbia Coatings Staff
Published: June 18, 2026
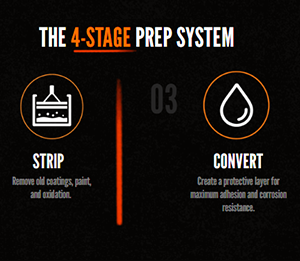
You know the four stages of prep: Clean, Strip, Convert, Repair and Protect. That is the system. Every durable coating job moves through some combination of those stages, but you…
By: Columbia Coatings Staff
Published: June 10, 2026
Most powder coating failures start before powder is ever sprayed. Fish eyes, peeling, adhesion problems, they trace back to the prep line, not the booth. This article breaks down the…

By: Columbia Coatings Staff
Published: June 2, 2026
Welcome to our Frequently Asked Questions page! This resource is designed to evolve alongside our progress and community needs. We’ll be updating this page regularly with new information and answers,…
By: Columbia Coatings Staff
Published: May 17, 2026
This guide is written for coaters who want to understand what’s actually happening when wrinkle powder cures, and how to control it. If you’ve sprayed wrinkle and gotten inconsistent results,…
By: Columbia Coatings Staff
Published: May 7, 2026
ATTENTION: Powder is VERY heat sensitive. Due to the high heat index, Columbia Coatings recommends selecting an expedited shipping method for your powder deliveries in order to preserve the quality of your powder.…

By: Columbia Coatings Staff
Published: April 22, 2026
Level Up Your Shop: The Columbia Coatings Rewards Breakdown! Stop just buying, start earning. At Columbia Coatings, we know you’re putting in the work to get that perfect finish. Whether…
By: Columbia Coatings Staff
Published: February 11, 2025
While primers are not required for all projects, they can serve as a foundation for subsequent topcoats by providing improved adhesion and corrosion resistance. Available in two primary chemistries, epoxy…
Outgassing in Powder Coating
When Surface Cleaning Is Not Enough
You cleaned the part. You may have cleaned it twice. The degreaser bath was at concentration, the temperature was right, the dwell time was correct. The part came out of the cleaning stage looking ready, and then you coated it. After the cure, there they were pinholes, bubbling, or small craters scattered across the surface or concentrated at specific areas. Not “fish eyes.” Something different.
You ran the part through the degreaser again and recoated. Same defects. Same locations. You changed the degreaser concentration. Still there. You changed the powder. Still there.
The contamination is not on the surface. It is inside the metal.
This is outgassing, and no surface cleaning method in the world can fix it, because the problem is not on the surface.
What Outgassing Is, and What It Does to Your Coating
You have seen this before, just not in a powder coating shop.
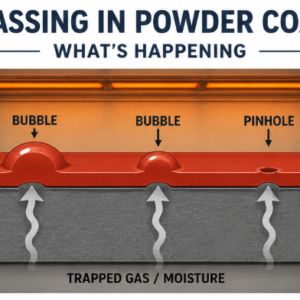
Pour pancake batter into a hot pan. As the batter heats up, trapped air and moisture inside the batter expand and push toward the surface. You see the bubbles form. Some pop and leave pinholes. Some stay as bumps. The surface of the pancake is never as smooth as the batter was when it went in.
Now replace the pan with a casting. Replace the batter with your powder coat. Replace the trapped air with oils, moisture, and gases that have been absorbed into the pores of the metal for months or years.
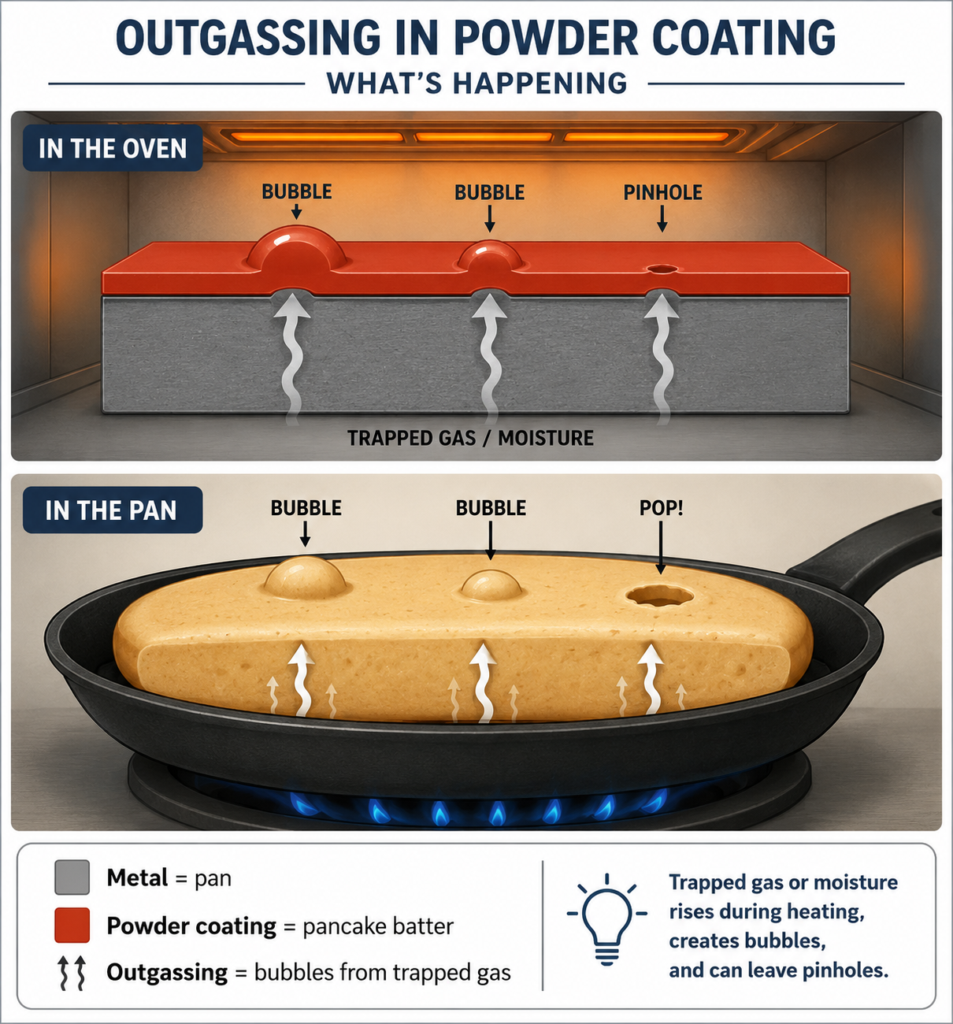
The same thing happens. The oven heats the part. The trapped contaminants expand. They push up through the coating. The result is pinholes, bubbling, craters, and blistering that appear during or immediately after cure.
The difference between a pancake and a casting is that you expect the pancake to bubble. You do not expect your coating to. But the physics is identical. Trapped gas plus heat equals bubbles at the surface. If there is a coating on top when the gas escapes, the gas pushes through it and leaves a defect.
Metals that are cast, welded, or have been in service for extended periods absorb contaminants into the pores of the metal itself. Oils from machining. Moisture from the environment. Gases from the casting process. These contaminants are trapped inside the metal structure, not sitting on the surface. No degreaser can reach them. No blast media can remove them.
You can run the part through the degreaser a hundred times and the defects will still appear, because the source is not on the surface. It is inside the metal.
Two Ways to Solve the Same Problem
There are two approaches to dealing with outgassing. One removes the contamination. The other contains it. Both prevent the same defects.
If You Pre-Bake
Pre-baking drives the contamination out. You heat the part above cure temperature before any coating is applied. The trapped gasses escape while the surface is bare instead of pushing through your finish.
Heat the part to at least the cure temperature or 15-20 degrees above the cure temperature of the powder you plan to use. Hold it at that temperature for 15 to 30 minutes. The goal is to reach a temperature high enough to force the trapped contaminants to escape while nothing is on the surface to trap them.
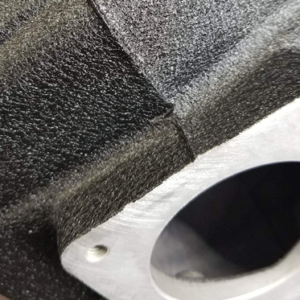
What you will see during a successful outgas: smoke, vapor, or a visible haze coming off the part. That is the trapped contamination leaving. On heavily contaminated parts (old castings, long-service engine components), the smoke can be significant. On lightly contaminated parts, it may be barely visible.
What you will see when the part is done: the smoke stops. The part comes out of the oven looking the same as it went in, but the trapped contamination is gone. The surface may show a slight discoloration or darkening from the heat, which is normal and does not affect the prep stages that follow.
Some parts need more than one cycle. A heavily contaminated casting that smokes heavily on the first bake may still have trapped contaminants after 30 minutes. Run it again. If the second bake produces minimal smoke, the part is ready. If it still smokes significantly, keep going until the bake is clean.
Pre-baking works best when the part fits in your oven and the production schedule allows the extra cycle time.
If You Use an Outgassing Primer
Pre-baking drives the contamination out. An outgassing primer takes the opposite approach. It seals the trapped gasses in.
The primer goes on before the topcoat and acts as a barrier between the metal and the finish coat. When the part enters the cure oven, trapped gases may still try to escape, but the primer absorbs or contains them so they do not push through the topcoat. The gasses are still in the metal. It just cannot reach the finish.
An outgassing primer is the practical choice when pre-baking is not an option. The production schedule cannot absorb the extra cycle time. The shop does not have a dedicated oven for pre-baking. In those situations, the primer solves the same problem from a different direction.
Which Approach Fits
Both prevent the same defects. The decision comes down to what your shop setup and schedule allow.
If you have the oven capacity and the time, pre-baking is the more thorough approach because the contamination is gone, not just contained. If pre-baking is impractical for the job in front of you, an outgassing primer gives you a path to a clean finish without the extra bake cycle.
Some shops use both. Pre-bake the worst castings to drive out the heaviest contamination, then apply a primer before topcoating as an added layer of protection. That belt-and-suspenders approach is common on high-value parts where rework is not an option.
Which Parts Need Outgassing?
Not every part needs this step. New sheet steel, laser-cut plate, and freshly fabricated structural steel generally do not have trapped contamination. The metal is dense enough and new enough that nothing has had time to penetrate the pores.
The parts that need outgassing share common characteristics.
Cast iron and cast aluminum.
The casting process creates a porous metal structure with air pockets, voids, and microscopic channels. Oils and gases get trapped in those pores during casting, during machining, and during storage. Cast parts are the most common outgassing candidates and the most likely to produce defects if the step is skipped.
Welded assemblies.
The heat-affected zone around a weld changes the metal structure and can create pockets where contaminants get trapped. Parts with extensive welding, especially if they were machined or oiled after welding, often need outgassing.
Parts that have been in service.
An engine block, a transmission housing, a manifold, a bracket that has been soaking in oil for 20 years. These parts have had decades to absorb contaminants deep into the metal. Surface cleaning removes what is on top. The rest is inside.
New castings.
Even brand new castings can have trapped oils, moisture, and gases from the casting process itself. New does not mean clean when the metal is porous.
Hot-rolled steel with heavy scale.
In some cases, the oxide layer on hot-rolled steel can trap moisture and contaminants underneath. Blasting removes the scale but the trapped contaminants remain in the surface layer of the metal.
The general rule: if the part is cast, heavily welded, or has been in service with exposure to oils or fluids, assume it needs outgassing until a test proves otherwise.
Where Outgassing Fits in the Prep Sequence
This is where operators disagree, and our survey confirmed it. One respondent wrote: “I blast then out gas. I see a lot of comments of the reverse.”
That respondent is thinking about it correctly. The sequencing question has a real answer, and it comes down to what each step is trying to accomplish.
The recommended sequence is: clean the part first, then strip or blast, then outgas if necessary, then conversion coating.
Clean first because if you outgas a greasy part, you are baking grease into the surface at high temperature. That makes the contamination harder to remove, not easier. Clean the surface contamination off first so the outgas step deals with trapped contamination only.
Strip or blast second because you want the surface bare before outgassing. If the part has an old coating, that coating acts as a cap that traps gases inside during the bake. The gases cannot escape through a layer of old powder or paint. Remove the coating first so the outgas step has an open path.
Outgas third because now the part is surface-clean and bare. The pre-bake drives out trapped contaminants through an open surface. Nothing is blocking the escape path. Nothing on the surface is getting baked in.
Convert fourth because the part is now truly clean, surface and subsurface, and the conversion coating can bond to the actual metal instead of to contamination or heat-altered residue.
Why Some Shops Outgas Before Blasting
Some shops outgas first and blast second. Their reasoning: outgassing can leave discoloration or residue on the surface from the escaping contaminants, and blasting after removes that residue while also creating the surface profile.
That logic is not wrong. Blasting after outgassing does clean up the surface. But it means the part was outgassed with surface contamination still on it and possibly with an old coating still on it. Both of those conditions reduce the effectiveness of the outgas step.
If your shop outgasses in a different order and gets consistent results, the current process is working. But if you are seeing persistent pinholes or bubbling even after outgassing, the sequencing may be part of the problem.
How to Test for Outgassing Before You Start Coating
If you are not sure whether a part needs outgassing, the test is simple and costs nothing but oven time.
Take one part from the batch. Clean it. Strip it if needed. Then put it in the oven at your planned cure temperature or 15-20 degrees higher for 20 to 30 minutes. Watch it.
If you see smoke, vapor, or haze coming off the part, it needed outgassing. Run the rest of the batch through the same pre-bake before coating.
If the part bakes clean with no visible vapor, outgassing is probably not necessary for that batch. Proceed with the normal prep sequence.
This test takes 30 minutes and one part. It saves you from coating an entire batch that will all show pinholes after cure. That math is not close.
The test also tells you more than just yes or no.
- How much contamination is trapped. Heavy smoke means heavy contamination. Light haze means light contamination. The severity tells you whether one outgas cycle is enough or whether the batch needs two or three.
- Where the contamination is concentrated. If smoke comes from specific areas (weld zones, machined surfaces, one end of the casting), those areas had more exposure to oils or moisture. That information helps you adjust your prep for similar parts in the future.
- Whether your cleaning is working. If the test part smokes heavily even after thorough degreasing, the contamination is genuinely subsurface. If it barely smokes, the degreasing may have handled most of it and outgassing is marginal for this part type. That distinction helps you decide whether to outgas every part of this type or only the heavily contaminated ones.
Common Outgassing Mistakes in Powder Coating Prep
Outgassing without cleaning first. Baking a greasy part at high temperature does not remove the grease. It carbonizes it onto the surface. Always degrease before outgassing. The pre-bake is for trapped subsurface contamination, not for surface oils.
Not going hot enough. If the outgas temperature is below the cure temperature of the powder you plan to use, the trapped contaminants may not fully volatilize during the pre-bake but will volatilize during cure. That is exactly the failure you were trying to prevent.
Not holding long enough. Heating the part to temperature is not enough. The part needs to stay at temperature long enough for heat to penetrate the full thickness and reach all the trapped contamination. Thicker parts need longer hold times. A thin bracket and a thick casting do not need the same cycle.
Outgassing with the old coating still on. An old coating on the surface acts as a cap. The trapped gases cannot escape through it efficiently. Strip or blast the old coating off before outgassing so the gases have a clear escape path.
Assuming one cycle is always enough. Heavily contaminated parts, especially old castings and long-service components, may need two or three outgas cycles. If the part still smokes on the second bake, it is not done. Keep going until the bake is clean.
Coating immediately after outgassing without cooling properly. A part that is still hot from the outgas oven will interact differently with conversion chemistry and powder application than a part at the right temperature. Allow the part to cool to the appropriate temperature for your next stage before proceeding.
Frequently Asked Questions
What is outgassing in powder coating?
Outgassing is what happens when trapped contamination inside a metal part escapes during the cure cycle and pushes through the coating. The fix is to either drive the contamination out before coating (pre-bake) or seal it in so it cannot reach the finish (outgassing primer). Cast metals, welded assemblies, and parts in long service are the most common candidates.
What causes pinholes and bubbling in powder coating?
Pinholes and bubbling that appear after cure and do not respond to cleaning changes are typically caused by trapped contamination inside the metal escaping during the cure cycle. The contamination was absorbed into the pores of the metal over time and no surface cleaning can reach it. The solution is outgassing before coating, either through a pre-bake or an outgassing primer.
How do I know if a part needs outgassing?
If the part is cast iron, cast aluminum, heavily welded, or has been in service with exposure to oils or fluids, it likely needs outgassing. The definitive test: clean the part, put it in the oven at your planned cure temperature or 15-20 degrees higher for 20 to 30 minutes, and watch. If you see smoke or vapor, the part needs outgassing. If it bakes clean, it probably does not.
How long should I outgas a part?
Put it in the oven at your planned cure temperature or 15-20 degrees higher for 20 to 30 minutes. Thicker parts need longer hold times. If the part still smokes after the first cycle, run it again. The goal is a clean bake with no visible vapor before the part moves to coating.
Should I outgas before or after blasting?
After. The recommended sequence is clean first, then strip or blast, then outgas. The surface should be clean and bare before the pre-bake so trapped contaminants have an open escape path and surface contamination does not get baked in. If your shop outgasses in a different order and gets consistent results, the process is working. If pinholes persist, the sequencing may be part of the problem.
What is an outgassing primer?
An outgassing primer is applied before the topcoat and acts as a barrier. When trapped gases try to escape during cure, the primer absorbs or contains them so they do not push through the finish. The contamination stays in the metal but cannot damage the coating. It is the practical choice when pre-baking is not an option due to part size, oven capacity, or production schedule.
Do new parts ever need outgassing?
Rarely for fabricated steel. Frequently for castings. A brand new casting can still have oils, moisture, and gases trapped from the casting process itself. If you are coating new castings and seeing pinholes, outgas even though the part has never been in service. New does not mean clean when the metal is porous.
Can I use both pre-baking and an outgassing primer?
Yes. Some shops pre-bake the worst castings to drive out the heaviest contamination, then apply a primer before topcoating as added protection. That approach is common on high-value parts where rework is not an option.
Outgassing is not a step every part needs. But for the parts that need it, no amount of surface cleaning, blasting, or chemistry adjustment can substitute for it. The contamination is inside the metal. The only way to deal with it is to either drive it out or seal it in.
If you are fighting pinholes and bubbling that do not respond to cleaning changes, this is probably the answer. One test bake on one part will tell you for certain.
The test costs 30 minutes of oven time. The alternative is coating an entire batch and stripping them all when the defects show up after cure. That math is not close.
This article is part of the Prep Like a Pro series from Columbia Coatings.